.png)
Plywood Planter Boxes
- Rae Fleming

- May 13, 2021
- 3 min read
I'm so excited about this project because I got to work with my one and only brother - Ty - on it!! This project was beyond my skill level (too many steps, tools and measurements!), so I planned on doing it only if Ty agreed to help me (he's been buzzing for years!). It's rare we get to buzz together since I live in Minneapolis and he lives in Atlanta, so this was a unique opportunity. We had a blast working together while visiting our folks together in early April. Our Mom was really impressed with how well we worked together as adults since there was a time she wasn't so sure we'd ever get along. I learned a ton of tips and tricks on this project and am so happy with the results. Instead of paying $120+ each for a planter, I made two using scrap wood found in my parent's garage. Win!! They were happy to see it get used!
Supplies
> 1" thick plywood
> 1x1x8 wood piece to secure sides
> 1" finishing screws
> wood filler, putty knife
> tape measure/carpenter's square
> pencil
> anchor piece of wood and clips (or vice)
> Drill and bits
> Circular saw or table saw
> Sander, 120 & 200 grit paper
> exterior paint
> exterior primer
Determine how tall you want your planters to be. Mine are 36" so they sit just below the door knob of the house while sitting on the landing. We cut the sheet of plywood into 36" pieces.

2. Create a wood template by which to draw and cut the other eight pieces so they all match exactly. I created a tapered piece by measuring 12 inches on top and 8 inches on the bottom and connecting the corners. Again with the math! Cut out your template.


3. Position the template to maximize the plywood and trace a total of eight pieces. Using the circular saw (in my case) or table saw, cut the lines. I used anchor pieces and clamps to assure my circular saw cuts remained straight. Ty was very precise in placing the anchors to account for the saw blade. So many good lessons learned in the project!


4. Once all eight side pieces are cut, measure the 1x1 pieces to the top 3rd of the planter. My pieces were 30" long because my planters are 36". Cut pieces. Here's our stack of cut wood. I love the smell of fresh cut wood!


5. For each planter, you will need to screw two pieces of 1x1 to two sides pieces. Make sure to account for the width of the plywood when placing the 1x1. I used a drill to establish the screw holes before securing the piece with screws.


6. Once the 1x1s are in place, create a box by placing the sides with the 1x1s opposite each other and connecting them with the other side pieces. This is when another set of hands comes in handy! ;) Be sure to offset the screws in the sides so they don't collide with each other inside the 1x1. Also, be sure to counter sink the screws if you want don't want them to show in your final product. If your pieces aren't lining up perfectly use your body weight and force things to line up before screwing together. I also added finishing screws into the plywood directly to force the top of each box to line up better.


7. Measure and cut a piece of plywood to create a shelf inside the planter for a potted plant to sit. The shelf rests perfectly on top of the 1x1s.


8. Use wood filler to protect the plywood edges (top, sides, bottom) from warping and expanding in the elements. I also filled the nail indentations to hide the nails.


9. Sand the entire piece smooth once again. I started with a 120 grit followed by a 200 grit. Clean off any saw dust particles.

10. Using an exterior primer, prime the entire planter inside and out, including the shelf. In hindsight, you could prime each board before assembling the planter.


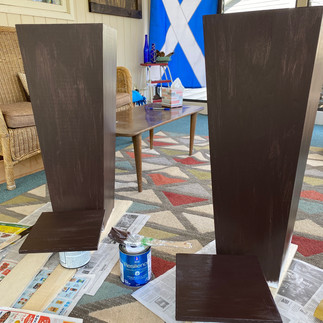
11. Using an exterior paint, paint each planter including the inside to at least where the shelf sits. I colored matched our exterior trim so the planters would coordinate with the house (Black Bean by Sherwin Williams).


12. Fill with your favorite potted plant! Our house is north facing so it's all coleus and begonias for me!


I'm so happy with how these turned out AND that they were only made possible by the help of my buzzing brother, Ty! I anticipate some maintenance to the paint next Spring, but that is a fraction of the cost of buying new! What ways are you sprucing up your curb or garden this year!?


Very professional looking! Love it!
Love it- great helper too!